
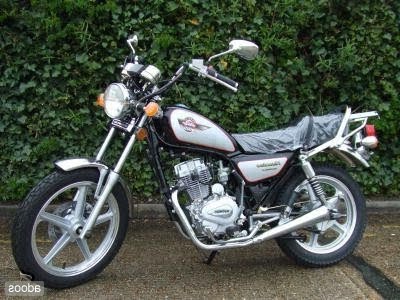
After ordering my bike-in-a-box from LS Imports (aka Asia Motorcycle), everything went smoothly. I called them on the morning of Friday 13th March 2009, and spoke to a nice chap called Drew who took the order. He couldn't spell Huonaio either.
Delivery was promised for Wednesday 18th March, which isn't next day, or even 48 hour, but it's perfectly reasonable for shipping a heavy crate from Portsmouth, Englandland to Glasgow, Scotchland. All I cared about was a reliable date.
And it was reliable. The local delivery outfit called on the Tuesday to confirm delivery, and promised "late morning to mid-day". At 10:30 am on Wednesday 18th, the lorry pulled up outside, while I was on the phone sorting out insurance.
Let's detour to that. Finding an insurer for a Chinese bike does seem to be a bit of a lottery. Rampdale insurance - no link for them - list the Huoniao, but charge fairly usurious rates. Still, they'll insure you. Carole Nash insurance had to do a bit of searching, and only found one underwriter (Red Star) who would cover it, and only 3rd party at that. My phone cut off before we got to the quote.
So I ended up going with Bikesure (aka Adrian Flux) who found a 3PF&T policy for £142 including personal injury cover. Not as cheap as I'd like, but it'll do for a first-year price. Covering a chassis number was no problem, and the documents should be on the way.
And another detour to documents. The paperwork for the HN125 turned up on Tuesday 17th - posted 2nd class, the cheap baskets - and all look to be in order. There's a certificate of conformity, an import document, and a V55/4 all pre-filled in as promised. I should just need an insurance document (plus my driving license) to get the bike registered as new.
OK... back to the bike, which I'm helping the truck-monkey wheel into the garage as I wrap up with Bikesure. The pallet is about 6' high - the bike is standing vertical - and just squeaks under the garage door. The trunk-monkey says that bikes used to be delivered horizontally, but it costs more, so he's seeing them vertical now. He opines that it can't have any oil in it. I disagree. I later find out that I'm right, and it's nicely full of oil, which I'll be changing after its first road run.
Looking inside, everything seems to be in place, so I sign for it and I'm left alone with my new toy.
It's the work of a moment to cut away the cardboard outer, exposing a bike bolted to a frame. The frame is a little beat-up, but it's there to protect the bike, so I'm not bothered about that. The bike itself looks fine. There's a moment's panic as I try to locate the handlebars, until I realise that they're bubble-wrapped around the tank.
First order of business is to lighten the load. The front wheel is secured at the side of the frame near the top. One diagonal member needs unbolted, then two ties cut and the wheel can be taken out.
Next problem: getting the bike from vertical to horizontal. I consider rigging a rope from the rafters of my garage to try and lower it down, but then in a fit of manliness, rock the whole frame forward to feel the weight. It doesn't feel like 150kg, so I tip it a bit further towards me. Still feels OK. With a cry of Hadouken! I just let it tip, and lower it down. It's surprisingly manageable; no crunching of spine.
OK, we're down! Then in with the socket and spanners to take the frame apart. It's all common sense, just unbolt and move on. As I unbolt the back, I discover that the rear rack, mudguard and seat are all held on with a common bolt, which is handy to know.
At this point, I realise that I should be charging the battery. It comes dry in a box-of-bits in the box-of-bike, along with a sealed can of acid. You're supposed to use a little tube to get the acid into each cell, but I can't get it to stay on the stubby nozzle, so what the hey; I just squirt it into each cell, and mop up the spills. Won't be the first time.
With the battery on to charge, it's back to the bike. In short order the top and sides are removed, leaving the bike sitting in a solid bottom tray. I've been wondering how and when to get the front wheel on, but it's clearly not going to be possible until the bike is completely free of the frame.
At this point, I put the (newly discovered) handlebars on. It's pretty idiot-proof, using two clamps and 4 Allen bolts. Note to self: loctite the heck out of them later. I also loosely attach the front brake, and the throttle and power/lights assembly at this point. The brake is secure enough, but the throttle/power assembly only has two small bolts holding it on, and doesn't seem secure. We'll come back to that.
Then back to removal from the frame. The front axle is bolted through the frame, so that needs to come out, using a rubber mallet and a soft drift (ok, a long screwdriver, tapped gently). That's the bike now completely unsecured from the frame, but how to get it out? The rear wheel is sitting in a trough, and it's not for rolling - I later discover that it's got the front mudguard wedged onto the bottom of the rear wheel.
The answer is pleasantly simple. I can just lift the rear end up and out of the frame, twist it and put it down beside it. Then around to the front and lift the front forks out, move them to the side, lower and... the bike is free of the frame. Huzzah! Today, I am a man. A bike-lifting man.
A bit of tidying and re-inventorying follows. I can find homes for nearly all the clamps and bolts, barring 2 bolts and 4 chrome blanking plugs.
Next, the front wheel. At this point, the bike is sitting on its rear wheel and front forks. It stands up by itself, but precariously. I have a good go at getting it up onto its centre stand, but it's too heavy to haul all the way up from this low down.
A bit of head-scratching follows. I'm on my own at this point, so how to get the bike up?
The solution is to sling a rope over the rafters and around the centre of the handlebars, then carefully car-jack it up at the bottom of its main frame, standing and tightening the rope from time to time. I have to keep the bike balanced all the time, and it falls off once; the rope catches it and stops it crashing down.
On the second attempt, it falls again, but the rope is holding the front higher this time. A manly heave, and it's up on the centre stand. No inanimate lump of metal is going to outwit me!
Then it's just a matter of getting the front wheel on. The only tricky part is getting the brake pads far enough apart to fit the disk in. There's a spreader fitted to keep them apart in transit, but as soon as it's removed, they ease closed. I know I shouldn't, but I go in with a screwdriver and carefully pry them open, wiggle the disk in a bit, pry some more, wiggle, pry... and we're in.
Then the speedo cable attaches to one side of the wheel (needs a bit of wiggling), and a short brass tube to the other (ah, that's what it was for), and we're ready to offer up to the forks. I take the opportunity to add some more grease to the axle first, lift the wheel, and the axle goes through with some gentle rubber hammer persuasion. Then comes out again, as I notice that I've got the offside fork reversed; the mounts for the mudguard need to be on the inside.
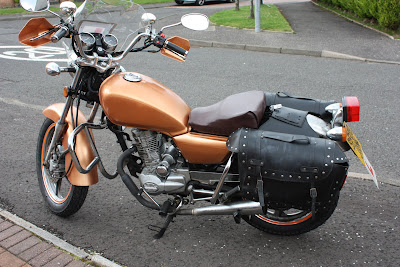
That sorted, we're pretty much there. All the major bits are on, so now it's battery in. Handily, the red wire is dangling out from behind the right panel below the seat, so it doesn't take any guessing. It might be possible to get it in without removing the seat, but I want to have a look anyway, so I take it off - remember, the rear mounts are the common bolts with the bumper and chrome rack. Unbolted, it just pops back and out.
The battery drops in easily, and is held in place with a rubber cable-thing. Ah, the posts need the final two bolts in the box. Just those chrome blank plugs and some cable-ties left over. There's a vaguely triangular shaped metal plate in the battery box that I'm convinced is supposed to go outside the battery, but I can't quite get it to fit under the side panel, so it's left off for now.
OK, everything in place? Ah, mirrors. Loctite 'em. Tighten the handlebars properly; loads of loctite. Put the front brake and throttle/main power unit on tightly. It feels like the throttle/power unit isn't going to secure with just two bolts, but it tightens up eventually. And loctite, loctite, loctite.
Right, key in, twist: we have power. POWAH! Let's go for it!
Check the fuel tap; it's at off. Ah hah - while I'm there, I notice that the outlet at the top of the fuel tap isn't connected to the carb. There's an obvious dangling fuel pipe coming from the carb, curiously with a pointy end and no end clamp. Take note of this. Never mind, push it on to the fuel tap and let's get on with it.
So, a bit of fuel in the tank... wait for leaks... wait... more fuel... wait... OK, that's about 3 litres. Fuel tap to on. Nothing appears in the sight. OK, flip it up to reserve, and the sight fills up nicely.
We've got power, we've got fuel, so we should be good to go, right? Let's gooooooooo!
The starter turns the engine like a good-un. It doesn't fire after a few seconds though, so I stop and check the choke lever under the seat. It's down, which I think from my Honda CG CBT (and later confirm) means it's off. I push it up to full on and try again. Nothing.
What's up? Check the master rotary cut-off. It's in the centre position, which should be power-on. CRANK! THROTTLE! CRANK! THROTTLE! Oh, what's that spilling on the garage floor? Uh-oh. Fuel tap off, sharpish!
There's fuel dripping out of the bottom of the bike. Oh dear. Oh dear.
A bit of mopping up, then I trace it right back up to just under the carb. Head scratching. Tap to on, crank... it's coming out of... that pipe there. That dangling fuel pipe coming out of the carb, with a square end and a clamp. Hmm.
At this point, I realise that I've connected the carb breather to the fuel tap, and left the fuel line dangling. And yes, when you do that, fuel goes in the breather and out the fuel line.
D'oh.
One switch-around later, some more mopping, and let's crank. Grararar-rumble-rumble-rararar-rumble-rumble... off the starter and we're... we're... stalling. Crank, gentle throttle roll, grarararumble-rumble-rumble and we're running.
The engine heats quickly and comes off the choke within a minute or so, then starts sweetly after that. One thing that all owners of these bikes seem to say is that they start sweetly, and I can definitely believe it. Plumbed up properly, it feels very willing.
And that's us pretty much done. A dash more brake fluid to top it up (although it wasn't critical), a little tightening on the rear brake and I'm almost out of things to fiddle with. Some drag-runs up and down the garage confirm that the engine, clutch, 1st gear and brakes all work, for low energy values of work.
For £550 and a box of bits, I don't think we can say fairer than that.
A quick slather with ACF-50 and it's time for bed. Well, time to post this, then bed.
Hi Colin the triangle is for your License plate and the chrome plugs are for covering the handle bars alan bolts
ReplyDeleteRedPox1st
Ah! Super, thanks for pointing that out.
ReplyDelete